Imagine you want to realize a platform for stream processing in your company, retaining control over the storage engine and the deployment processes, while allowing a high degree of freedom to the end users that will write the data manipulation pipelines.
A common solution to this might be to develop several microservices: each microservice would host and implement the data transformations of choice; it would subscribe to the updates from the data channel and publish them on a different data queue.
The benefit of maintaining separate microservices is that separate teams are able to develop the data transformations at their own speed, using the language of their choice.
The downsides are known: you are solving an organizational problem by putting a network boundary between teams; and what’s a network boundary between friends?
You might know Dylibso for our open-source project Extism; our goal is to empower teams to write extensible software using the tools and the languages of their choice. We do so by providing a range of SDKs and Plugin Development Kits (PDKs) for many different programming languages and runtime environments.
Recently we opened up a beta to our product XTP, further closing the gap between microservice development and plugin delivery.
In this example, we will walk you through how to develop a simplified data transformation platform:
- using XTP to define the plugin interface,
- Extism as the plugin system,
- a Java stream processing engine with Quarkus (including native image support!)
- and Kafka as a data transport layer.
Running Example: Time Series in the Financial Domain
In the financial domain, time series data plays a crucial role in analyzing and predicting market trends. For instance, imagine we have a continuous stream of stock price updates. Each update contains information such as:
- Stock symbol (e.g., AAPL for Apple Inc.)
- Timestamp of the price update
- Current price
- Trading volume
Our goal is to create a series of data transforms that can process this raw data into meaningful insights. Some examples of transformations we might want to apply include:
- Calculating moving averages over different time windows
- Detecting sudden price spikes or drops
- Computing trading volume trends
- Generating buy/sell signals based on predefined strategies
These transformations will help financial analysts and automated trading systems make informed decisions based on real-time market data.
The picture above shows the complete application that we will develop in the following.
Table of Contents
Extism exposes a simple, if low-level interface: functions take bytes as an input and return bytes as their output. For all intents and purposes, you can think of them as a generalization of UNIX pipes
Extism at its core leverages WebAssembly as a code delivery medium, and as a lingua franca across platforms. At the time when Extism was first developed, the WebAssembly landscape was still in its infancy: the ecosystem had still to agree on a proven standardized, cross-platform, cross-language, low-level calling convention to glue code together. Not only was it not specified how two WebAssembly modules would link together, but also the interaction between a host and a guest was implementation-defined.
In fact, in many ways, this is still the case. The goal for Extism was to define a practical, cross-platform way to develop plug-ins that would work on all of the run-times and platforms that we wanted to support. This is why Extism was developed with a simplistic model: we wanted a frictionless mechanism to interoperate.
While XTP is still completely optional (you are still free to use Extism to your own liking), we believe it completes the experience with the missing bits; we provide:
- a data schema representation, largely lifted from OpenAPI, to define the plug-in APIs
- a transparent serialization mechanism, based on JSON
- a content delivery platform to distribute plug-ins
Let’s see how this could would work to model data transforms over a Kafka record.
First, head over to xtp.dylibso.com and create an account if it is your first time. Then create an App and an Extension Point for it, let’s say kafka-transform .
We will define a simple Record type and a function transform: Record -> array of Record

Our Record may take many different shapes, but at its core, it is just a struct with the following components:
- a key
- a value
- a topic
- an array of headers (key/value pairs)
Now, the topic is generally represented as a string, while key and value, at their lowest level, are arrays of bytes.
Using XTP Schema, we could define it as follows:
Our Record may take many different shapes, but at its core, it is just a struct with the following components:
- first, key, value pairs in our headers can be represented as strings
- the key in the Record can be represented as a string, too, because we will never treat it differently. We will use the key for the symbol (AAPL, EURUSD, etc).
- in our domain, the value is itself a structured type Order: a date/time field, a price, represented as a 64-bit floating point number, and a volume (i.e. the size of an order for the given price), as an integer number
In this case, the schema will look as follows:
version: v1-draft
components:
  schemas:
    Order:
      properties:
        date:
          type: string
          format: date-time
          description: Date/time of the order
        price:
          type: number
          format: double
          description: Closing price of the order
        volume:
          type: number
          description: The volume of the order
      description: An order from the market.
    Header:
      properties:
        key:
          type: string
        value:
          type: string
      description: A key/value header pair.
    Record:
      properties:
        key:
          type: string
        topic:
          type: string
        value:
          $ref: "#/components/schemas/Order"
        headers:
          type: array
          items:
            $ref: "#/components/schemas/Header"
      description: A plain key/value record.
💡 Currency as a floating point number? The horror! Indeed, this might sound horrifying at first, but, depending on your specific goal, it might be acceptable.
In the case of aggregate analysis, a single point in time can be less accurate. Besides, the goal for this project is not to be 100% ready for production but to propose an interesting use case.
However, if the use of a 64-bit float still irks you, you can pick your poison: either a string, to be parsed in “user-space” or a fixed-point integer, using your favorite encoding.
We will also define the transform: Record -> array of Record as follows:
exports:
  transform:
    input:
      $ref: "#/components/schemas/Record"
      contentType: application/json
    output:
      type: array
      items:
        $ref: "#/components/schemas/Record"
      contentType: application/json
    description: |
      This function takes a Record and returns an array of Records.
The reason why we return an array of Records instead of a single record is that we want to give the transform the freedom to return 0..n records. For instance:
Our Record may take many different shapes, but at its core, it is just a struct with the following components:
- we might want to filter out some data, and return 0 items;
- an aggregate function might need to fill its moving window before the first meaningful value can be returned; during this time gap, we will return 0 items, then we will start to emit 1 item at a time
- a single record could be spliced into multiple topics, or the result of the computation might be multiple records for the same destination topic. For this reason, we also include the
topic field in the Record struct.
You can now save the schema, and install the XTP CLI (if you didn’t already).
Login with xtp auth and you are now ready to develop your first plug-in! Create a directory in your project for your plugins e.g. mkdir plugins then cd into it and type:
xtp plugin init
Pick your favorite language from the list and then give it a name.
For this example, we will use Go. We will name our plug-in “max”.
The xtp tool generates an example project for you to complete; your main.go will look like this:
// Note: run `go doc -all` in this package to see all of the types and functions available.
// ./pdk.gen.go contains the domain types from the host where your plugin will run.
package main

// This function takes a Record and returns a Record.
// It takes Record as input (A plain key/value record.)
func Transform(input Record) ([]Record, error) {
	// TODO: fill out your implementation here
	panic("Function not implemented.")
}
We will write the aggregate function max. max takes a record and updates the global var max with highest value. We initialize the value at 0, because we know all inputs are strictly positive (they are prices from the market).
We will write the aggregate function max. max takes a record and updates the global var max with highest value. We initialize the value at 0, because we know all inputs are strictly positive (they are prices from the market).
For each input, we will publish the last max value to the topic max-output.
var max float64 = 0

func Transform(input Record) ([]Record, error) {
	input.Topic = "max-output"
	if input.Value.Price > max {
		max = input.Value.Price
	}
	input.Value.Price = max
	input.Value.Volume = 0 // Volume does not make sense here.
	return []Record{input}, nil
}
We can now save this and build the plug-in with xtp plugin build:
❯ xtp plugin build
Running build script: mkdir -p dist && tinygo build -target wasi -o dist/plugin.wasm .
🔨 Building dist/plugin.wasm
✅ Build successful: dist/plugin.wasm
We can also verify the output with xtp plugin call:
❯ xtp plugin call --wasi dist/plugin.wasm transform \
	-i '{"topic":"prices", "key": "EURUSD",
	    "value":{"date":"2024-10-11T18:09:27Z","price":1.3869,"volume":95}}'
[{"headers":null,"key":"EURUSD","topic":"","value":{"date":"2024-10-11T18:09:27Z","price":1.3869,"volume":0}}]
As a data analyst, we want to “back-test” our Data Transforms by feeding them known data to validate their output, and to re-evaluate their performance over historical data.
The XTP test framework is a perfect tool for the job.
First of all, we create a new file in tests/backtest.go. For the full contents, refer to the code at dylibso/xtp-kafka-demo. Each test will read from an input file with a time series. We will create a Record for each line in the file, call the Transform() function, and then verify that the output is the one we expect. In this case, our input is a CSV file, where the last field is the expected value.
//export test
func test() int32 {
	topic := "input-topic"
	key := "EURUSD"

	xtptest.Group("series-1", func() {
		scanner := bufio.NewScanner(
			bytes.NewReader(xtptest.MockInputBytes()))
		for scanner.Scan() {
			date, price, volume, expected := parseLine(scanner.Text())

			input := Record{
				Topic: topic, Key: key,
				Value: Order{Date: date, Price: price, Volume: volume},
			}
			inputBytes, _ := json.Marshal(input)
			outputBytes := xtptest.CallBytes("transform", inputBytes)

			results := make([]Record, 1)
			json.Unmarshal(outputBytes, &results)
			given := results[0]

			// Floating points should not be compared by equality.
			xtptest.Assert(
				fmt.Sprintf("sma(..., %.5f) ~= %.5f (%.5f)", price, expected, given.Value.Price),
				expected-given.Value.Price < .00001, "")
		}
	})

	return 0
}
For instance, paste the following tests/backtest.csv:
2021-01-02T05:01:01,1.3869,9,1.3869
2021-01-02T05:01:10,1.387,5,1.387
2021-01-02T05:01:12,1.3869,3,1.387
2021-01-02T05:01:14,1.3868,17,1.387
2021-01-02T05:01:30,1.3869,3,1.387
2021-01-02T05:01:50,1.3869,85,1.387
2021-01-02T05:02:01,1.3869,4,1.387
2021-01-02T05:01:10,1.3872,33,1.3872
2021-01-02T05:01:20,1.3873,15,1.3873
2021-01-02T05:01:21,1.3873,18,1.3873
2021-01-02T05:01:22,1.3870,18,1.3873
Let us now configure xtp.toml so that the xtp tool is aware of the test cases, by appending a [[test]] section:
[[test]]
name = "backtest"
build = "cd tests && tinygo build -o ../dist/backtest.wasm -target wasi backtest.go"
with = "dist/backtest.wasm"
mock_input = { file = "tests/backtest.csv" }
We can now run the test cases:
❯ xtp plugin test
🔨 Building backtest
🧪 Testing dist/plugin.wasm (backtest)

📦 Group: series-1
PASS ...... max(..., 1.38690) ~= 1.38690
PASS ...... max(..., 1.38700) ~= 1.38700
PASS ...... max(..., 1.38690) ~= 1.38700
PASS ...... max(..., 1.38680) ~= 1.38700
PASS ...... max(..., 1.38690) ~= 1.38700
PASS ...... max(..., 1.38690) ~= 1.38700
PASS ...... max(..., 1.38690) ~= 1.38700
PASS ...... max(..., 1.38720) ~= 1.38720
PASS ...... max(..., 1.38730) ~= 1.38730
PASS ...... max(..., 1.38730) ~= 1.38730
PASS ...... max(..., 1.38700) ~= 1.38730

11/11 tests passed (completed in 2.432ms)

all tests completed in 2.445ms
Wonderful! Now, confident that our data transform works as expected, we can publish it to the XTP registry with xtp plugin push:
❯ xtp plugin push
🔨 Building dist/plugin.wasm
Running build script: mkdir -p dist && tinygo build -target wasi -o dist/plugin.wasm .
✅ Build successful: dist/plugin.wasm
✅ Version ver_01j9xdkd5bf77v0e3mhnx8c371 uploaded for Plugin max
🧪 validated content-type...!
🧪 validated artifact content as webassembly...!
🧪 validated checkfile in modsurfer
🧪 artifact is valid (great job!)
🧪 Simulations
───────────────────────────────────────────────
      Simulation       Test Name  Info
───────────────────────────────────────────────
 ✅   All simulations             0 / 0 passed

✅ Version ver_01j9xdkd5bf77v0e3mhnx8c371 has been processed for Plugin max

💡 Run `xtp plugin view max --extension-point ext_01j928w0nffpathpb4r1xbwz4b` to see the details of the plugin
You can also verify that the plug-in is available in the registry with xtp plugin view --name max --extension-point xxxNNNNNNNN
❯ xtp plugin view --name max --extension-point ext_01j928w0nffpathpb4r1xbwz4b
Name: max
Owner: usr_01j6f7mkfefghvbm847qyas2z1
Extension Point ID: ext_01j928w0nffpathpb4r1xbwz4b
Status: Installed
Updated At: 2024-10-11T09:12:20Z
Bindings:
  - max
That’s it, you’ve built your first Kafka transform!
We now have to prepare our service to pull it down and apply it to the incoming data stream.
Workflow
Ok, now we have a way to:
- write a function written in Go, or in any other guest language supported by Extism.
- publish this function to the XTP registry
We can also update, disable and enable versions of these functions using the xtp tool.
💡 Currently, XTP supports scaffolding code from C++, C#, Go, Rust, Zig, Python, and TypeScript but we are adding more and more languages as we speak: the list of languages supported by Extism is actually larger, so if you want to add ”bindgen" support to your favorite language, check it out!
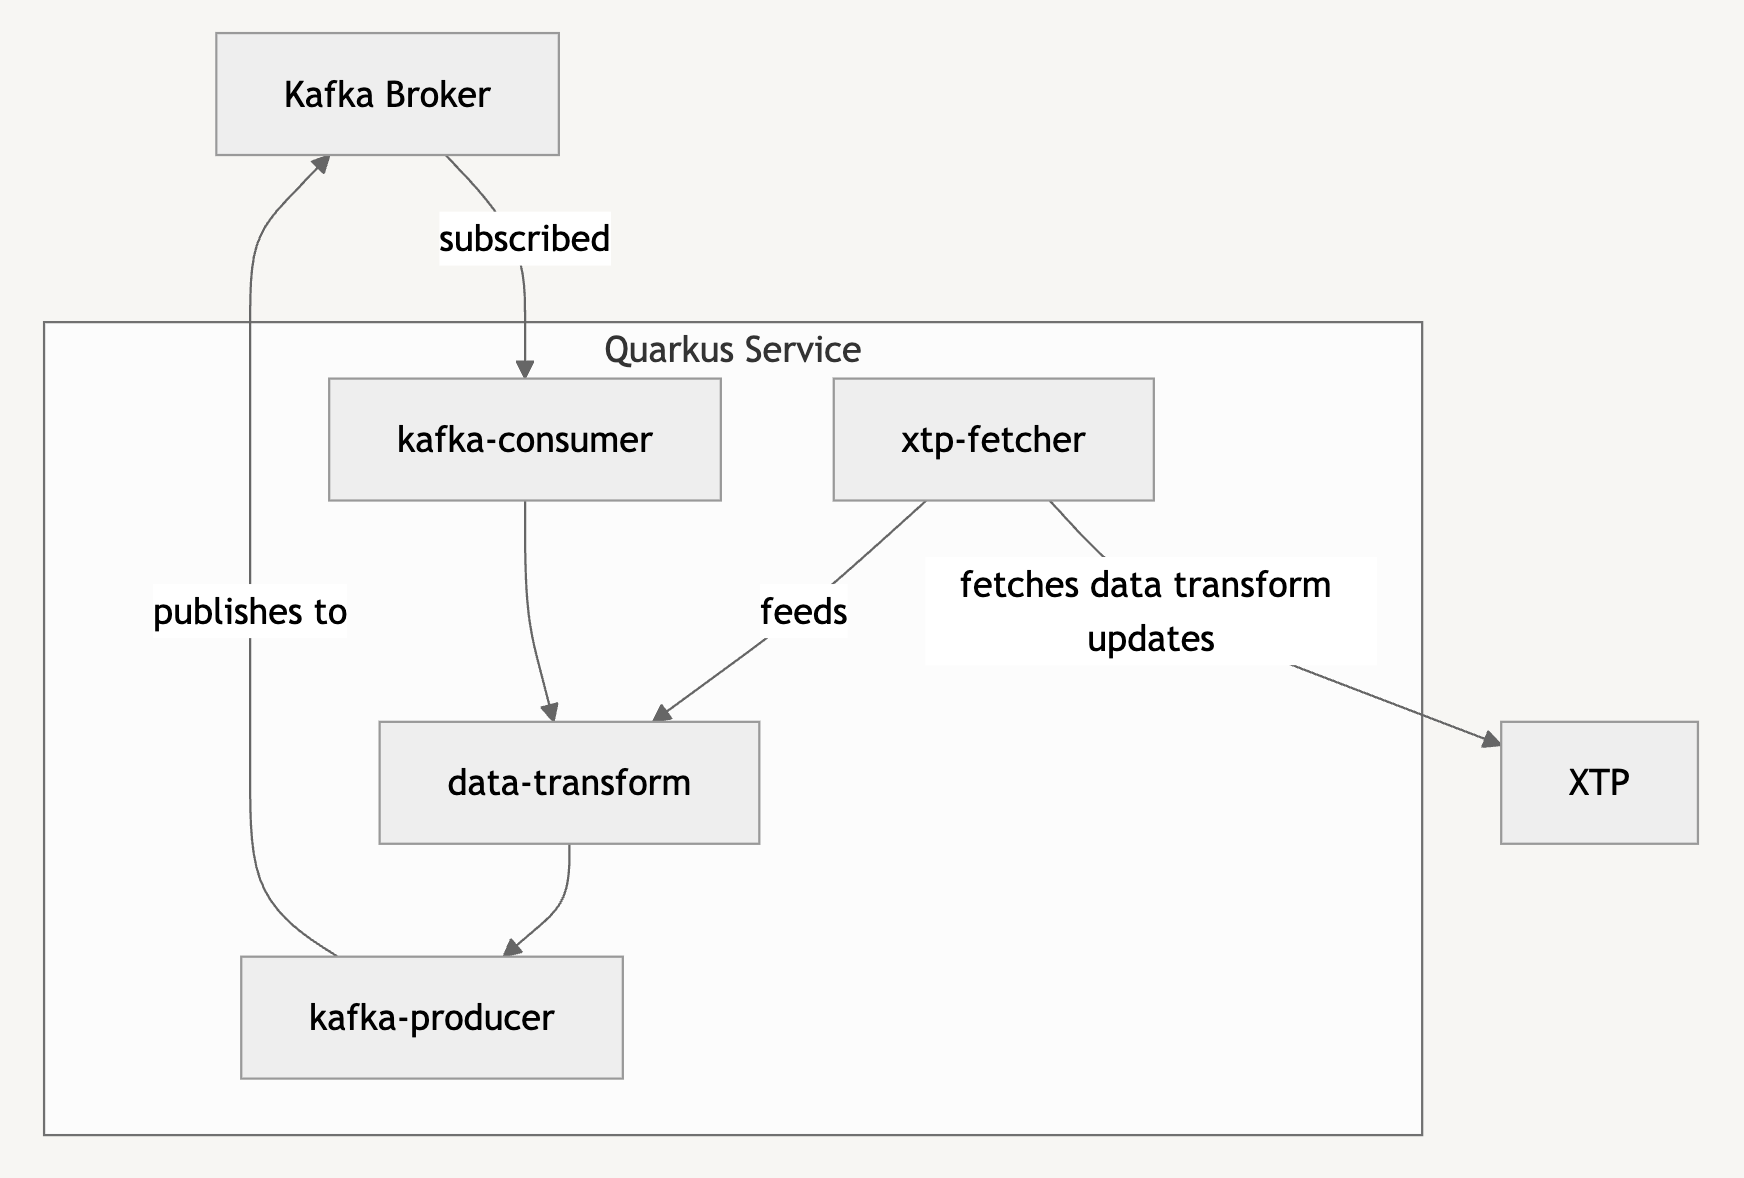
We now need a way to pull down our Kafka data transformations into a service that will subscribe to the topics in our Kafka cluster, and republish the result of each transformation to one or more topics.
At its core:
Streaming Data Analysis in Finance
In our domain, we will apply our data transforms to the incoming stream of Records with market orders and produce outgoing streams with the result of an analysis. Our analysis might be as complex as we want, but they will all be implemented using XTP plug-ins.
The XTP system allows us to test our plug-ins, push them to the registry, pull them down, and load them into our streaming engine. The streaming engine will be responsible for subscribing to the appropriate Kafka topics, applying the transforms to the incoming data, and then publish them to output topics.
Let’s see how we could implement this streaming engine using a Quarkus application.
A Streaming Engine using Quarkus
We won’t go too much into the details of how the Quarkus application works, you can refer to the code at dylibso/xtp-kafka-demo for the full details. You will find most code under app.
Checking XTP for updates
We implement a simple client for the XTP API. We will poll our extension point for updates. There are four cases we want to handle:
- a new transform has been published
- a transform has been updated
- a transform has been deleted
- a transform has not changed
We can conflate 1. and 2. into a single case.
The extension-points/{id} endpoint returns mappings name -> metadata. If there is an update, only then, we will also fetch the corresponding artifact.
void checkUpdates() throws IOException {
  Map<String, Extension> extensions = fetcher.extensions();
  Map<String, Extension> results =
    kafkaTransformStore.compareStored(extensions);

  for (var kv: results.entrySet()) {
    String name = kv.getKey();
    switch (kv.getValue()) {
    case Updated -> {
      var transform = fetcher.fetchTransform(
        name, extensions.get(name));
      kafkaTransformStore.update(transform);
    }
    case Deleted -> kafkaTransformStore.unregister(name);
    case Unchanged -> {}
    }
  }
}
The method transformStore.compareStored(extensions) (not shown here) returns an enum with the cases Updated, Deleted, Unchanged . Only in the Updated case we proceed fetch the corresponding transform.
A Kafka Transform is a wrapper for an Extism Plugin object. For this demo, we will use the experimental Chicory SDK, a version of the Extism Java SDK that leverages the Chicory runtime, an open-source pure-Java, portable, lightweight WebAssembly run-time initiated at Dylibso.
public static KafkaTransform fromInputStream(
  String pluginName, XTPService.Extension ext, InputStream is) throws IOException {
  // Read the Wasm binary.
  var wasm = ManifestWasm.fromBytes(is.readAllBytes()).build();
  // Setup the instantiation option.
  var options = new Manifest.Options().withConfig(Map.of(
    "transform-name", pluginName,
    "topic-name", String.format("%s-output", pluginName)));
  // Create the Manifest.
  var manifest = Manifest.ofWasms(wasm).withOptions(options).build();
  // Instantiate the plug-in.
  var plugin = Plugin.ofManifest(manifest).build();
  return new KafkaTransform(plugin, pluginName, ext);
}
The KafkaTransform invokes the lower-level plugin.call() API, transparently serializing the incoming Record to a byte array. Record is our own class, equivalent to a Kafka Record, except that it is serializable through a plain Jackson ObjectMapper.
public List <Record> transform(
  Record record, ObjectMapper mapper) throws IOException {
  return mapper.readValue(
    transformBytes(mapper.writeValueAsBytes(record)),
    new TypeReference <List<Record>> () {});
}

public byte[] transformBytes(byte[] recordBytes) {
  return plugin.call("transform", recordBytes);
}
We also implement a KafkaTransformStore exposing methods to register() and unregister() and update() data transforms; plus a transform method that applies all the transforms in the store to the given record.
Every time we receive a record from Kafka we copy it into our own serializable Record object. Then we apply each transform.
First of all, we can verify that everything is wired correctly by writing a unit test:
ObjectMapper mapper = new ObjectMapper()
  .registerModule(new JavaTimeModule())
  .disable(SerializationFeature.WRITE_DATES_AS_TIMESTAMPS);

@Test
public void testMaxTransform() throws IOException {
  var max = new File("../../plugins/max/dist/plugin.wasm");
  var fis = new FileInputStream(max);
  var ext = new XTPService.Extension("max", LocalDateTime.now(), "xyz");
  var transform = KafkaTransform.fromInputStream("max", ext, fis);

  // A transform returns a list of values; in this case we know it's always one.
  List <Record> r1 = transform.transform(new Record("price-in", "EURUSD",
    new Order(ZonedDateTime.now(), 1.234, 10), List.of()), mapper);
  List <Record> r2 = transform.transform(new Record("price-in", "EURUSD",
    new Order(ZonedDateTime.now(), 1.200, 10), List.of()), mapper);

  // In both cases the result is the highest value (max).
  assertEquals(1.234, r1.getFirst().value().price());
  assertEquals(1.234, r2.getFirst().value().price());
}
Now, we will receive data from the Quarkus named Channel pricing-data, that, in our case, will correspond to a Kafka topic with the same name. We will produce the result to a Channel called processed-price. However, as we mentioned earlier, the plugin publishes to a named topic, so the channel in this case is only a logic name used internally.
 @Inject
 ObjectMapper mapper;
 @Inject
 KafkaTransformStore transforms;

 @Incoming("pricing-data")
 @Outgoing("processed-price")
 @Acknowledgment(Acknowledgment.Strategy.POST_PROCESSING)
 Multi <Message<byte[]>> read(KafkaRecord <byte[], byte[]> pricingData) throws IOException {
   var r = Record.of(pricingData);
   return transforms.transform(r, mapper)
     .map(Record::toOutgoingKafkaRecord)
     .onTermination().invoke(pricingData::ack);
 }
The KafkaTransformStore#transform() method iteratively invokes the transform() method on each data transform in the store. we use a Multi stream to asynchronously process the sequence of filters (these could be also processed in parallel).
Also notice that, since each transform takes a Record and returns an array of Records, we flatten (flatMap) the result to a flat sequence of Records:
public Multi <Record> transform(Record r, ObjectMapper mapper) throws IOException {
  byte[] bytes = mapper.writeValueAsBytes(r);
  return Multi.createFrom()
    .iterable(transforms.values())
    .flatMap(f -> {
      byte[] bs = f.transformBytes(bytes);
      return Multi.createFrom()
        .iterable(toRecords(mapper, bs, headers));
    });
}
You can now start your application with mvn quarkus:dev
By producing data to the topic pricing-data with the correct format, e.g.:
{"date":"2024-10-13T13:10:00.006893Z","price":1.3842,"volume":123}
You will be able to follow the data produced to max-output with a client such as kcat:
❯ kcat -C -t max-output -b localhost:9092
...
{"date":"2024-10-13T13:10:00.006893Z","price":1.3842,"volume":0}
{"date":"2024-10-13T13:10:01.004967Z","price":1.3843,"volume":0}
{"date":"2024-10-13T13:10:02.005565Z","price":1.3843,"volume":0}
{"date":"2024-10-13T13:10:03.005603Z","price":1.3843,"volume":0}
{"date":"2024-10-13T13:10:04.003101Z","price":1.3843,"volume":0}
{"date":"2024-10-13T13:10:05.00422Z","price":1.3843,"volume":0}
{"date":"2024-10-13T13:10:06.003742Z","price":1.3843,"volume":0}
{"date":"2024-10-13T13:10:07.002441Z","price":1.3843,"volume":0}
{"date":"2024-10-13T13:10:08.002717Z","price":1.3845,"volume":0}
{"date":"2024-10-13T13:10:09.003725Z","price":1.3855,"volume":0}
{"date":"2024-10-13T13:10:10.005966Z","price":1.3855,"volume":0}
{"date":"2024-10-13T13:10:11.005644Z","price":1.3855,"volume":0}
{"date":"2024-10-13T13:10:12.005962Z","price":1.3859,"volume":0}
{"date":"2024-10-13T13:10:13.003474Z","price":1.3863,"volume":0}
% Reached end of topic max-output [0] at offset 143
...
The application on GitHub is pre-configured with a Simulator that will automatically produce simulated data to the pricing-data topic.
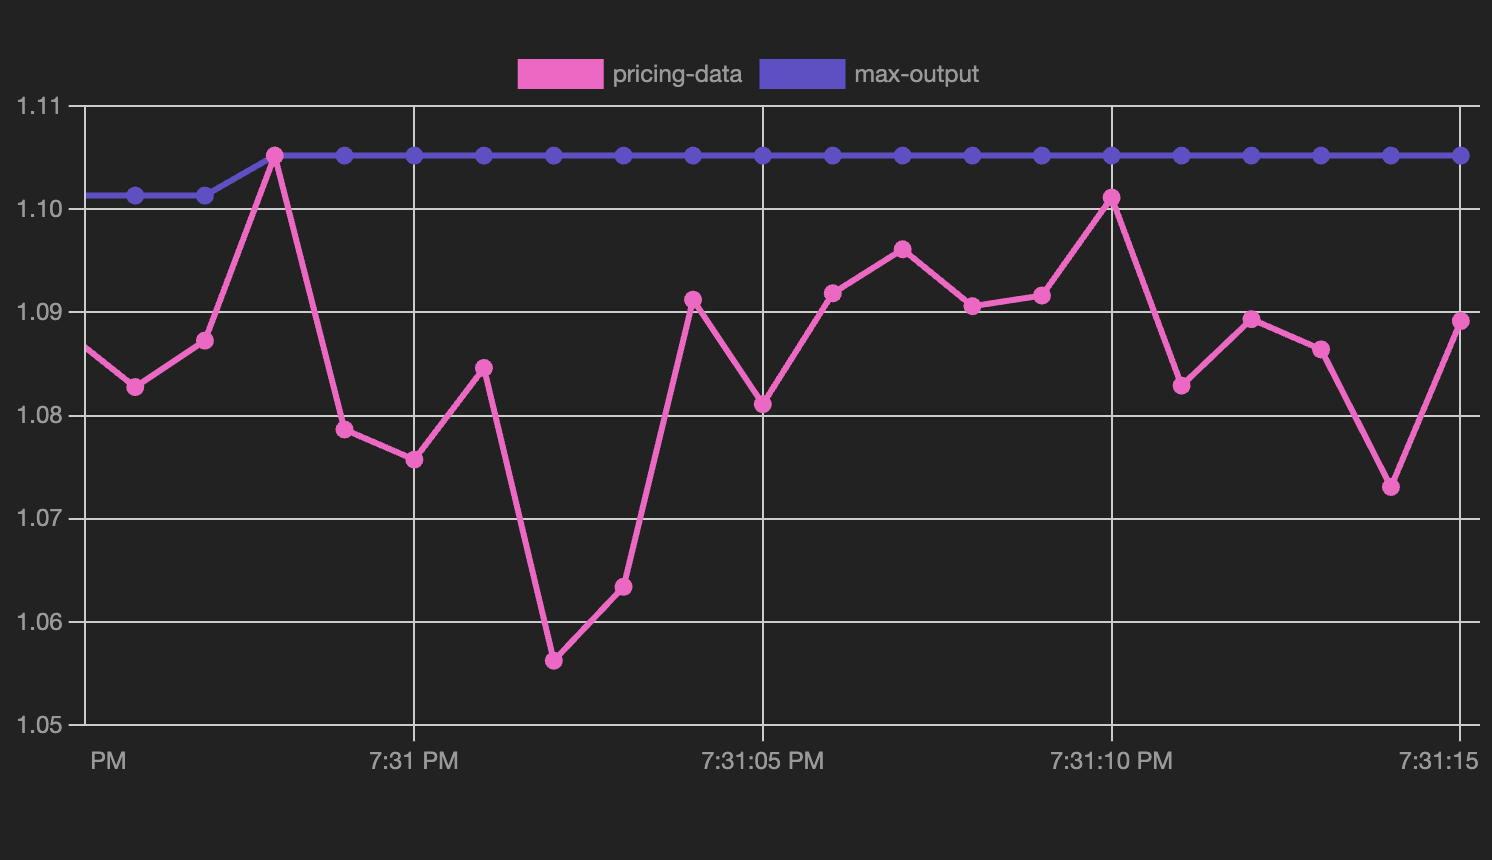
Now, this is all fine and dandy, but keeping track of all the transforms at once by scanning the serialized JSON payloads visually can be hard. Instead, we might provide a visualization to help. We won’t go into the details of how to implement this, but we provide a pre-made simplistic scrolling chart using Chart.js with the Streaming Plugin. The result is we can now visualize the max function and the pricing data:
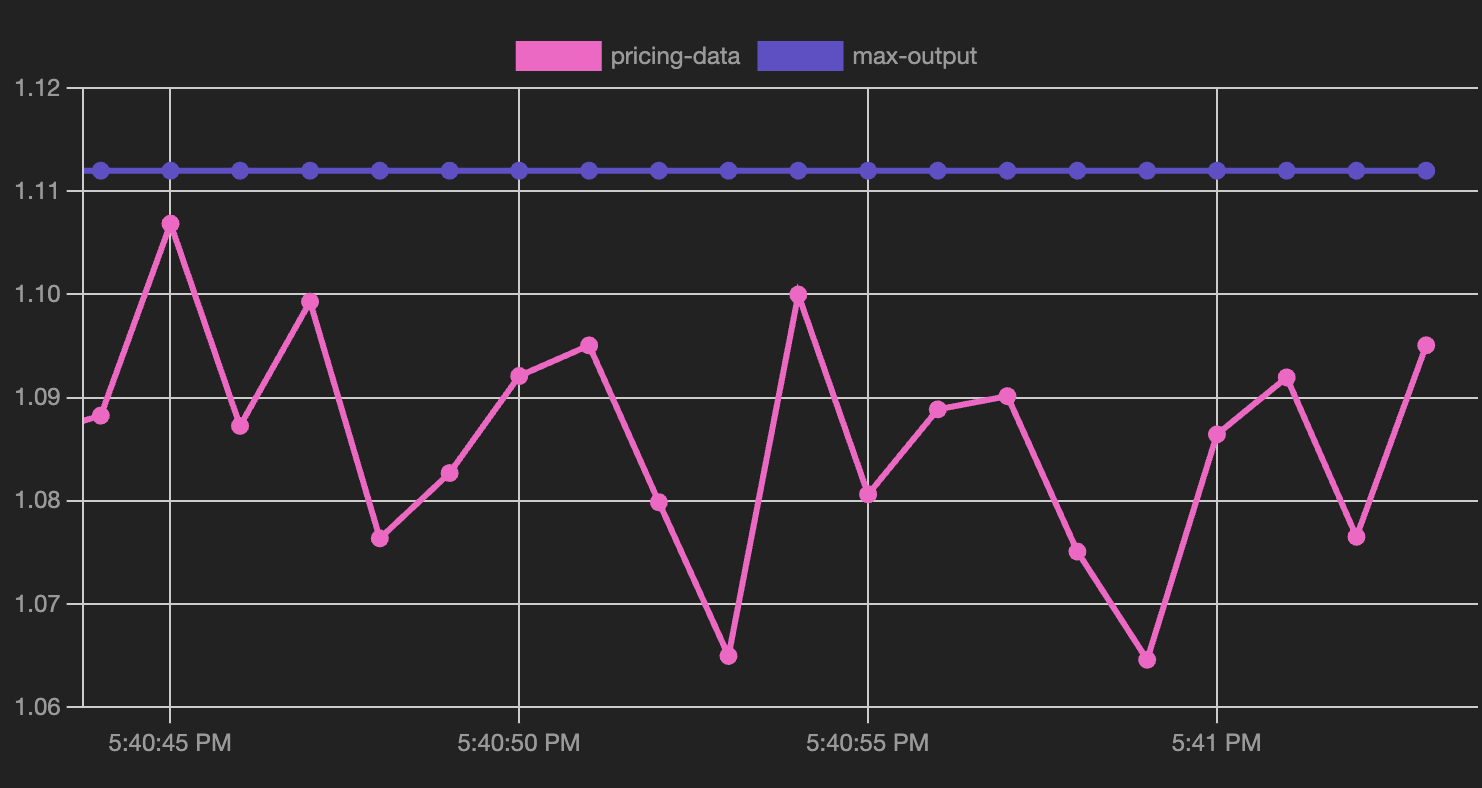
Obviously, the max function tends to be a straight line over time.
We can implement other functions and see how they perform. In this example we will use the cinar/indicator library to expose two types of moving averages:
1. a simple moving average (SMA), i.e. an average over moving a window of a given size (the period); in other words, if x1, x2, ..., xn are the prices:
2. a Volume-Weighted Average Price (VWAP), i.e. a moving average over a window where each price is weighted by the corresponding order volume; in other words if if x1, ..., xn are the prices and if v1, v2, ..., vn are the corresponding volumes:
💡 These functions would be simple enough to roll our own implementation, but we want to show how easy it is to import third-party libraries in a plug-in.
Simple Moving Average
Let’s create the sma plug-in with:
xtp plugin init --path sma
We will define a rolling window over a period of 10
import (
	"github.com/cinar/indicator"
	"github.com/extism/go-pdk"
)

const period = 10

type window struct {
	prices       [period]float64
	index, count uint
}
and we initialize it, together with a default topic value:
var (
	w     = &window{prices: [period]float64{}}
	topic = "sma-output"
)
The window has an append(Order) method: each time we append a new order we update its internal array of float64 called prices and update the index and the counter. The index always points within the array, and wraps around when it reaches the period, the counter always increases.
// append adds the Price of an Order to the current index.
func (w *window) append(o Order) {
	w.count++
	w.index = (w.count) % period
	w.index = (w.index + 1) % period
	w.prices[w.index] = o.Price
}
The ready() method is true when the window contains enough values to return a meaningful result.
// ready is true when the window has been filled.
func (w *window) ready() bool {
	return w.count >= period
}
The sma() method applies the indicator.Sma() function to window.prices and returns the last value of the returned array (which always contains the last update).
// sma applies the SMA function and returns the result.
func (w *window) sma() float64 {
	return indicator.Sma(period, w.prices[:])[period-1]
}
Finally, our Transform function returns a non-empty list only when ready() is true; in this case it assigns Price to the return value of w.sma() and clear the Volume.
func Transform(input Record) ([]Record, error) {
	w.append(input.Value)
	if w.ready() {
		input.Topic = topic
		input.Value.Price = w.sma()
		input.Value.Volume = 0
		return []Record{input}, nil
	} else {
		return []Record{}, nil
	}
}
We can also create a backtest, similar to the one we wrote originally, except the first period-1 values should be ignored (they will be empty lists):
//export test
func test() int32 {
	topic := "input-topic"
	key := "EURUSD"

	xtptest.Group("series-1", func() {
		  // ... omitted, same as above ...
			// Skip empty result sets and negative expected values.
			if len(results) > 0 && expected > 0 {
				given := results[0]
				// Floating points should not be compared by equality.
				xtptest.Assert(
					fmt.Sprintf("sma(..., %.5f) ~= %.5f (%.5f)", price, expected, given.Value.Price),
					expected-given.Value.Price < .00001, "")
			}
		}
	})
	return 0
}
The backtest.csv:
2021-01-02T05:01:01,1.3869,9,-1
2021-01-02T05:01:10,1.387,5,-1
2021-01-02T05:01:12,1.3869,3,-1
2021-01-02T05:01:14,1.3868,17,-1
2021-01-02T05:01:30,1.3869,3,-1
2021-01-02T05:01:50,1.3869,85,-1
2021-01-02T05:02:01,1.3869,4,-1
2021-01-02T05:01:10,1.3872,33,-1
2021-01-02T05:01:20,1.3873,15,-1
2021-01-02T05:01:20,1.3874,15,-1
2021-01-02T05:01:20,1.3875,15,1.38708
And the output:
❯ xtp plugin test
🔨 Building backtest
🧪 Testing dist/plugin.wasm (backtest)

📦 Group: series-1
PASS ...... sma(..., 1.38750) ~= 1.38708 (1.38708)

1/1 tests passed (completed in 1.38ms)

all tests completed in 1.397ms
Great! Now let’s deploy our plug-in with xtp plugin push and let’s see the result on the chart:
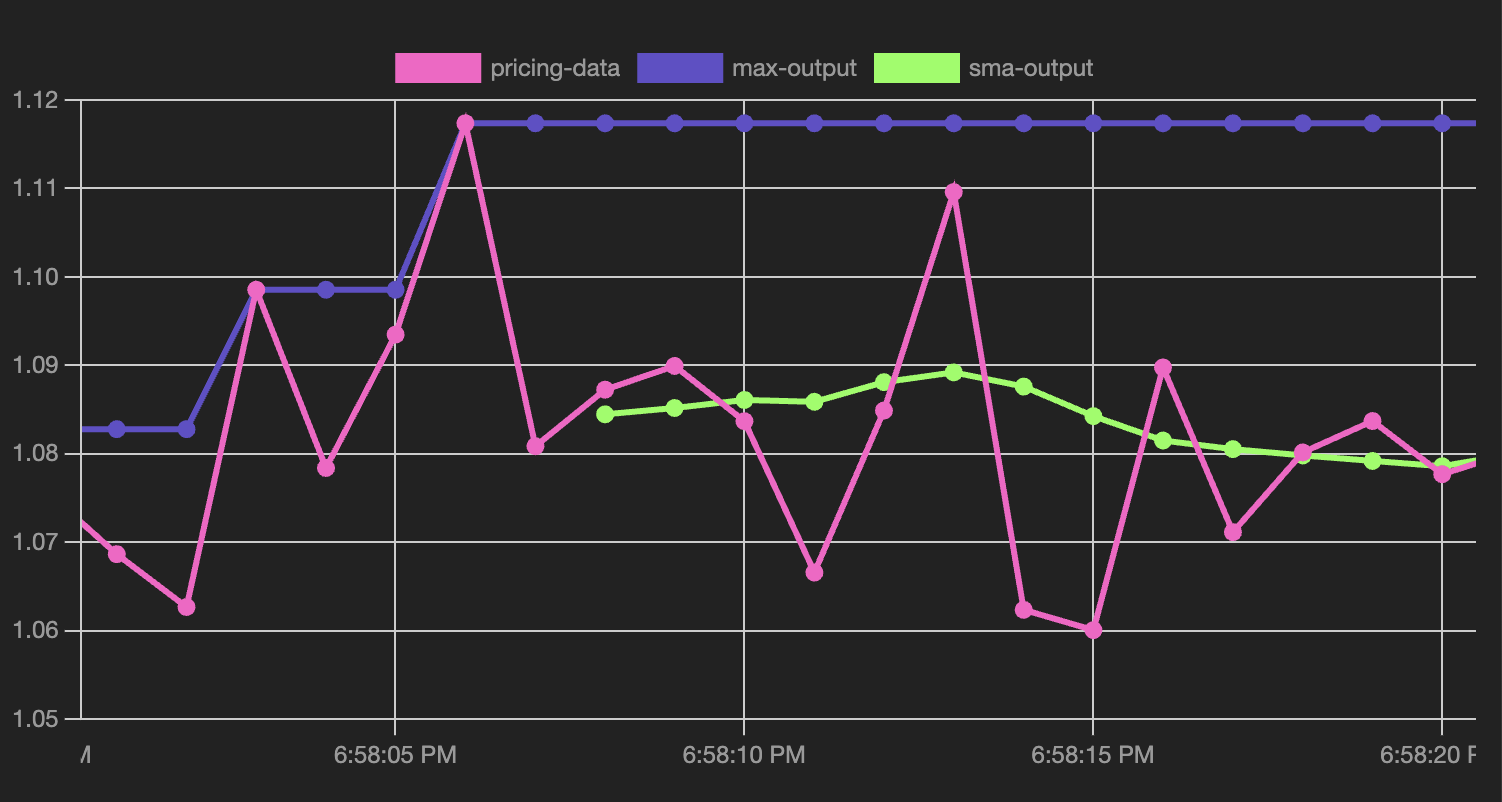
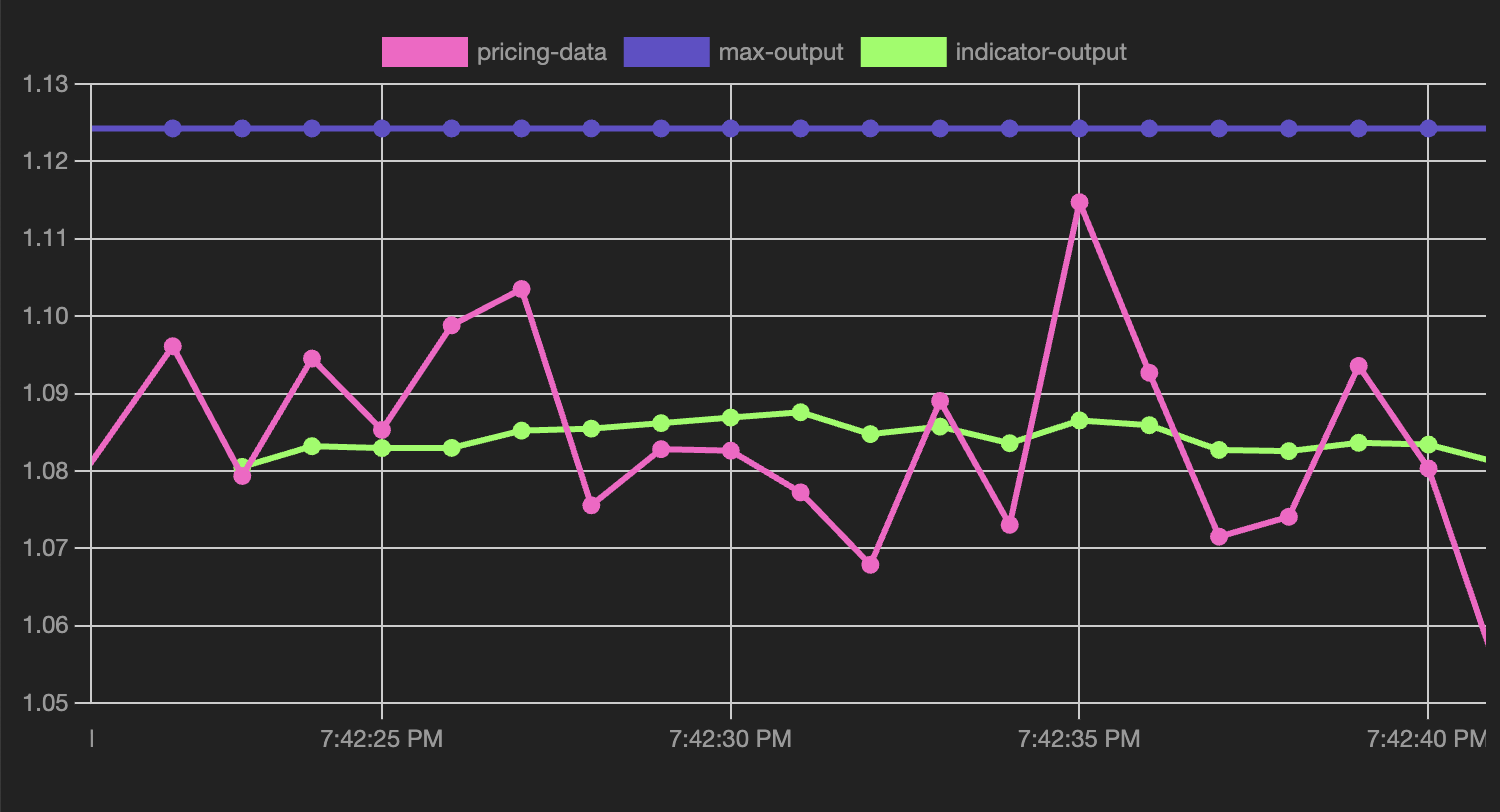
Notice that if you’ve been running the application in the background, the update will be loaded on the fly. However, even if you boot up straight away, it will take a few updates for the sma line to appear: this is because it will only publish after receiving at least period=10 orders.
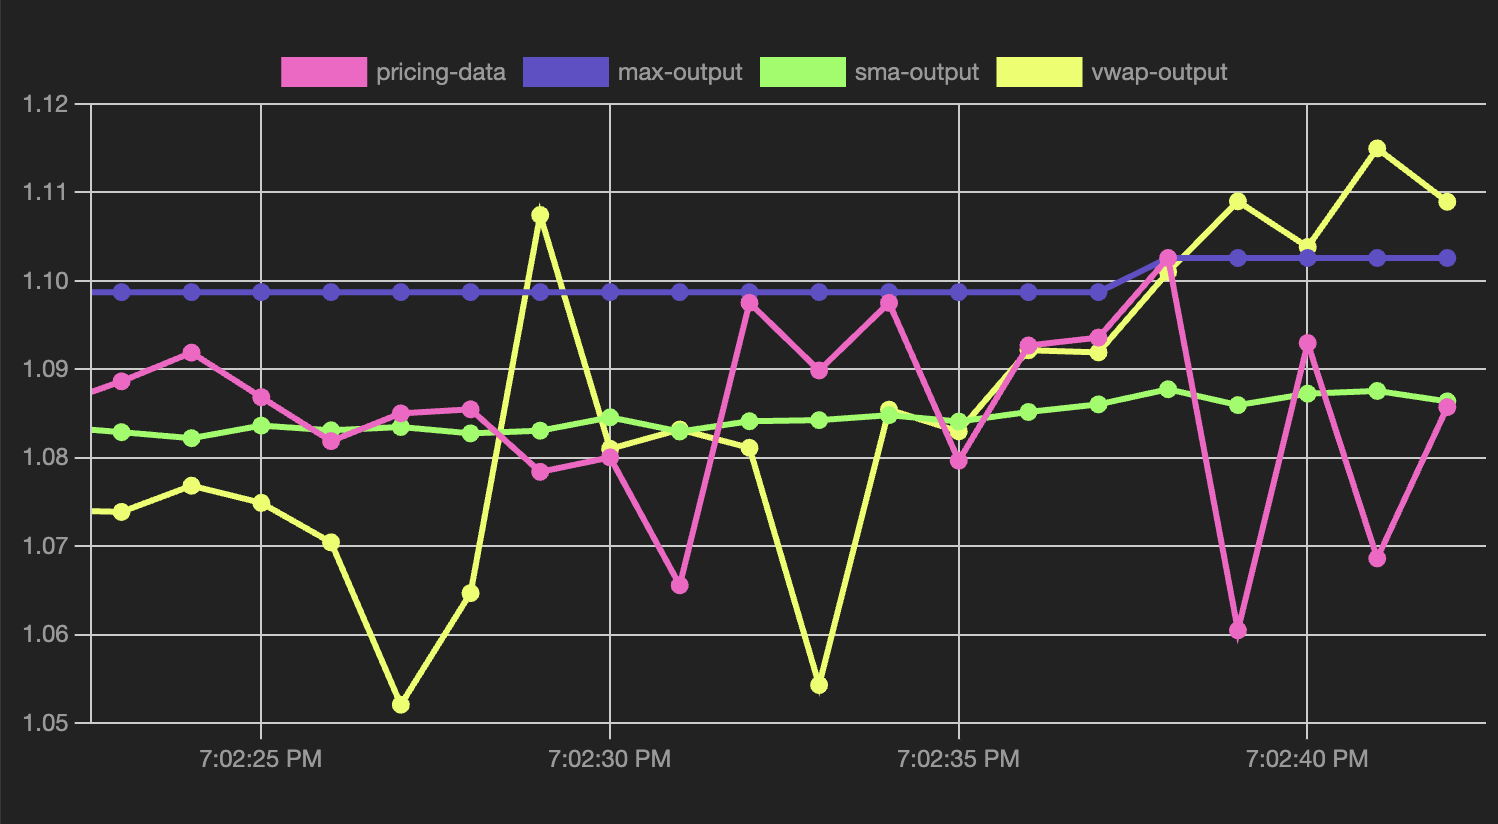
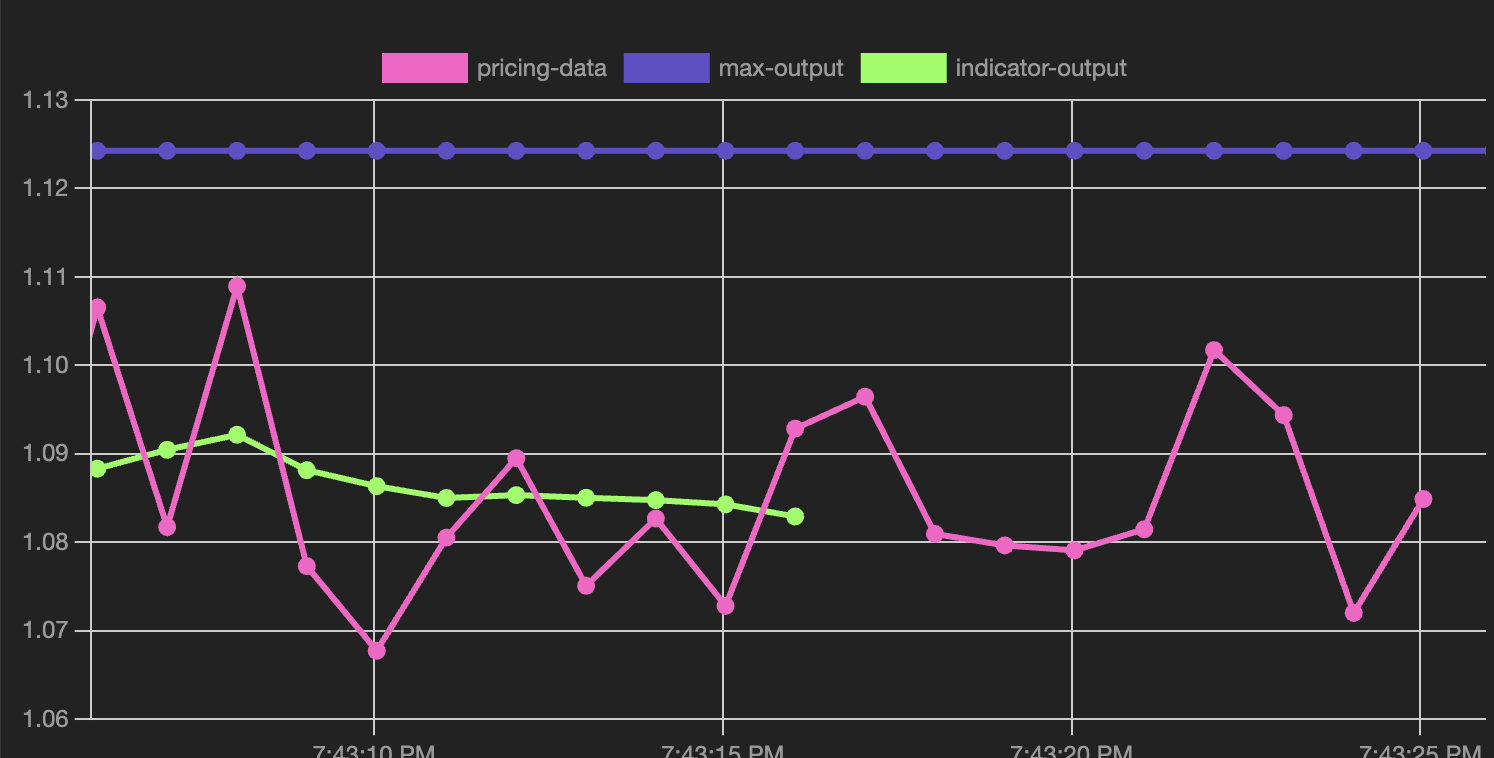
Also, notice that the behavior of the sma line is quite smooth. Let’s see what happens with a vwap.
Volume-Weighted Average Price
Create now a new plug-in called vwap. This plug-in only differs from sma for a few details. The window now also contains a volumes array of float64 (as required by the indicator library). Run xtp plugin init --path vwap, adding the following code:
type window struct {
	prices, volumes [period]float64
	index, count    uint
}
Which is initialized accordingly:
var (
	w     = &window{prices: [period]float64{}, volumes: [period]float64{}}
	topic = "vwap-output"
)
The append(Order) method now also updates the volumes, converting them to float64 :
func (w *window) append(o Order) {
	w.count++
	w.index = w.count % period
	w.prices[w.index] = o.Price
	w.volumes[w.index] = float64(o.Volume)
}
We define a vwap() method instead of sma() , but essentially similar:
func (w *window) vwap() float64 {
	return indicator.VolumeWeightedAveragePrice(
				period, w.prices[:], w.volumes[:])[period-1]
}
Just like the Transform function is essentially the same:
func Transform(input Record) ([]Record, error) {
	w.append(input.Value)
	if w.ready() {
		input.Topic = topic
		input.Value.Price = w.vwap()
		input.Value.Volume = 0
		return []Record{input}, nil
	} else {
		return []Record{}, nil
	}
}
The backfill.go test case is unmodified, but we do update backfill.csv with an updated line at the end, for the one expected vwap value:
...
2021-01-02T05:01:20,1.3875,15,1.38706
We can now xtp plugin test and xtp plugin push.
Let’s modify one last time vwap and sma, and add the following line:
func init() {
	if name, ok := pdk.GetConfig("topic-name"); ok {
		topic = name
	}
}
At startup, these data transforms will check for a config flag, and in case the value topic-name is set, then will override the topic value. Earlier, you might have noticed that a KafkaTransform is passed the topic-name as a config value:
Plugin plugin = Plugin.ofManifest(
    Manifest.ofWasms(wasm).withOptions(
      new Manifest.Options()
      .withConfig(Map.of(
        "transform-name", pluginName,
        "topic-name", String.format("%s-output", pluginName)))).build())
  .build();
The topic is inferred from the plugin name and it is {pluginName}-output. This was not useful so far, but it will come in handy now.
First of all, when a data transform is pushed with xtp plugin push it is automatically given a name, inferred from the plugin name itself. You can now check the plugin you have deployed with xtp extension-point view ext_NNNN:
❯ xtp extension-point view ext_01j9y0ypnjf17rpsyyt91kzq8h
Showing details for: ext_01j9y0ypnjf17rpsyyt91kzq8h

ID: ext_01j9y0ypnjf17rpsyyt91kzq8h
Name: kafka-transform
App: app_01j9y0td4ve9jagwxyhqhqc1d3

Exports:
 1. transform

Bindings:
 Binding Name   Plugin Name      Owner                           Updated At
 vwap           vwap             usr_01j6f7mkfefghvbm847qyas2z1  2024-10-13T16:59:14Z
 max            max              usr_01j6f7mkfefghvbm847qyas2z1  2024-10-13T13:09:14Z
 sma            sma              usr_01j6f7mkfefghvbm847qyas2z1  2024-10-13T16:57:43Z
You will notice that all names and bindings currently correspond. Let’s do something different, and delete the bindings for vwap and sma; assuming you are in the top-level directory where both vwap and sma are located, you can type:
xtp-demo/plugins on refactor-schema at github.com/evacchi/xtp-kafka-demo [✘!+?]
❯ xtp plugin unbind --name sma --path sma
✅ Plugin sma with name sma is now unbound from extension point ext_01j9y0ypnjf17rpsyyt91kzq8h
💡 Run `xtp plugin view sma --extension-point ext_01j9y0ypnjf17rpsyyt91kzq8h` to see plugin details
💡 Run `xtp extension-point view ext_01j9y0ypnjf17rpsyyt91kzq8h` to see extension point details
xtp-demo/plugins on refactor-schema at github.com/evacchi/xtp-kafka-demo [✘!+?]
❯ xtp plugin unbind --name vwap --path vwap
✅ Plugin vwap with name vwap is now unbound from extension point ext_01j9y0ypnjf17rpsyyt91kzq8h
💡 Run `xtp plugin view vwap --extension-point ext_01j9y0ypnjf17rpsyyt91kzq8h` to see plugin details
💡 Run `xtp extension-point view ext_01j9y0ypnjf17rpsyyt91kzq8h` to see extension point details
and if you run xtp extension-point view again:
❯ xtp extension-point view ext_01j9y0ypnjf17rpsyyt91kzq8h
Showing details for: ext_01j9y0ypnjf17rpsyyt91kzq8h

ID: ext_01j9y0ypnjf17rpsyyt91kzq8h
Name: kafka-transform
App: app_01j9y0td4ve9jagwxyhqhqc1d3

Exports:
 1. transform

Bindings:
 Binding Name   Plugin Name      Owner                           Updated At
 max            max              usr_01j6f7mkfefghvbm847qyas2z1  2024-10-13T13:09:14Z
Alternatively, you can also use the following version of this command, which gives you more information about the current state of the plug-ins:
❯ xtp plugin view --extension-point ext_01j9y0ypnjf17rpsyyt91kzq8h
Listing plugins for extension point ext_01j9y0ypnjf17rpsyyt91kzq8h


 Name       Owner                           Status       Updated At
 max        usr_01j6f7mkfefghvbm847qyas2z1  Installed    2024-10-13T13:09:14Z
 sma        usr_01j6f7mkfefghvbm847qyas2z1  Inactive     2024-10-13T16:57:43Z
 vwap       usr_01j6f7mkfefghvbm847qyas2z1  Inactive     2024-10-13T16:59:14Z
Alright, let’s fire up our application again:
We can now rebind our sma plug-in, this time using the name indicator:
xtp-demo/plugins on refactor-schema at github.com/evacchi/xtp-kafka-demo [✘!+?] took 1m44s
❯ xtp plugin bind --name indicator --path sma
✅ Plugin sma is now bound to extension point ext_01j9y0ypnjf17rpsyyt91kzq8h with name indicator
💡 Run `xtp plugin view sma --extension-point ext_01j9y0ypnjf17rpsyyt91kzq8h` to see plugin details
💡 Run `xtp extension-point view ext_01j9y0ypnjf17rpsyyt91kzq8h` to see extension point details
After a few seconds, thewill start to display using the new topic name indicator-output.
if you now unbind sma from indicator and quickly rebind it to vwap…
xtp-demo/plugins on refactor-schema at github.com/evacchi/xtp-kafka-demo [✘!+?]
❯ xtp plugin unbind --name indicator --path sma
✅ Plugin sma with name indicator is now unbound from extension point ext_01j9y0ypnjf17rpsyyt91kzq8h
💡 Run `xtp plugin view sma --extension-point ext_01j9y0ypnjf17rpsyyt91kzq8h` to see plugin details
💡 Run `xtp extension-point view ext_01j9y0ypnjf17rpsyyt91kzq8h` to see extension point details
xtp-demo/plugins on refactor-schema at github.com/evacchi/xtp-kafka-demo [✘!+?]
❯ xtp plugin bind --name indicator --path vwap
✅ Plugin vwap is now bound to extension point ext_01j9y0ypnjf17rpsyyt91kzq8h with name indicator
💡 Run `xtp plugin view vwap --extension-point ext_01j9y0ypnjf17rpsyyt91kzq8h` to see plugin details
💡 Run `xtp extension-point view ext_01j9y0ypnjf17rpsyyt91kzq8h` to see extension point details
…you will notice two things:
At first, the sma indicator will stop publishing, as it will be removed from the list of available data transforms:
Then, it will start publishing again, and a fatter dot will appear:
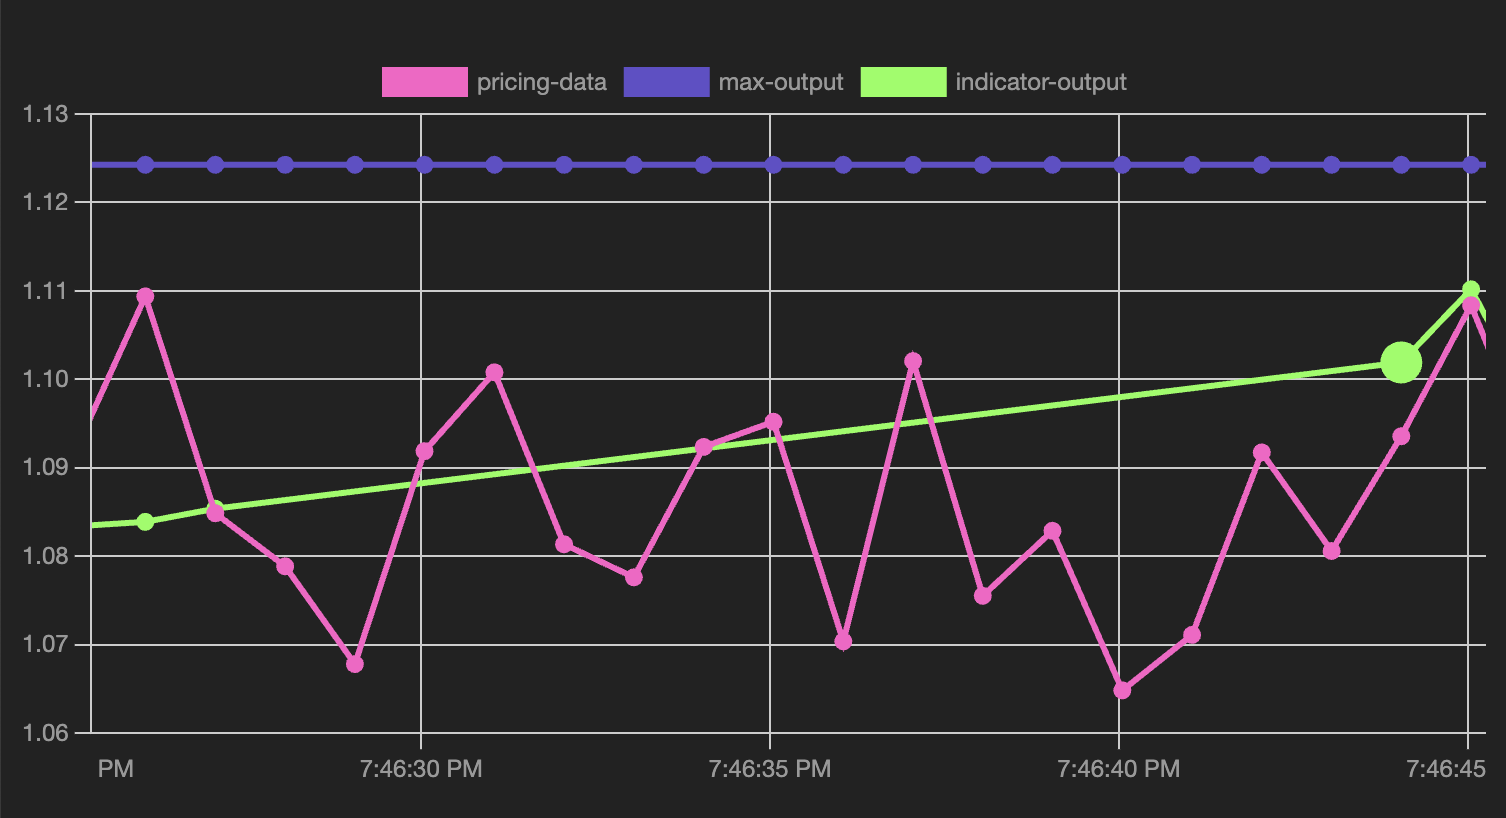
The fatter dot denotes a change in the plugin, it could be an updated version or a change in the binding. By hovering over any spot in the chart you can read more about every point. You can also click around to stop it from scrolling:
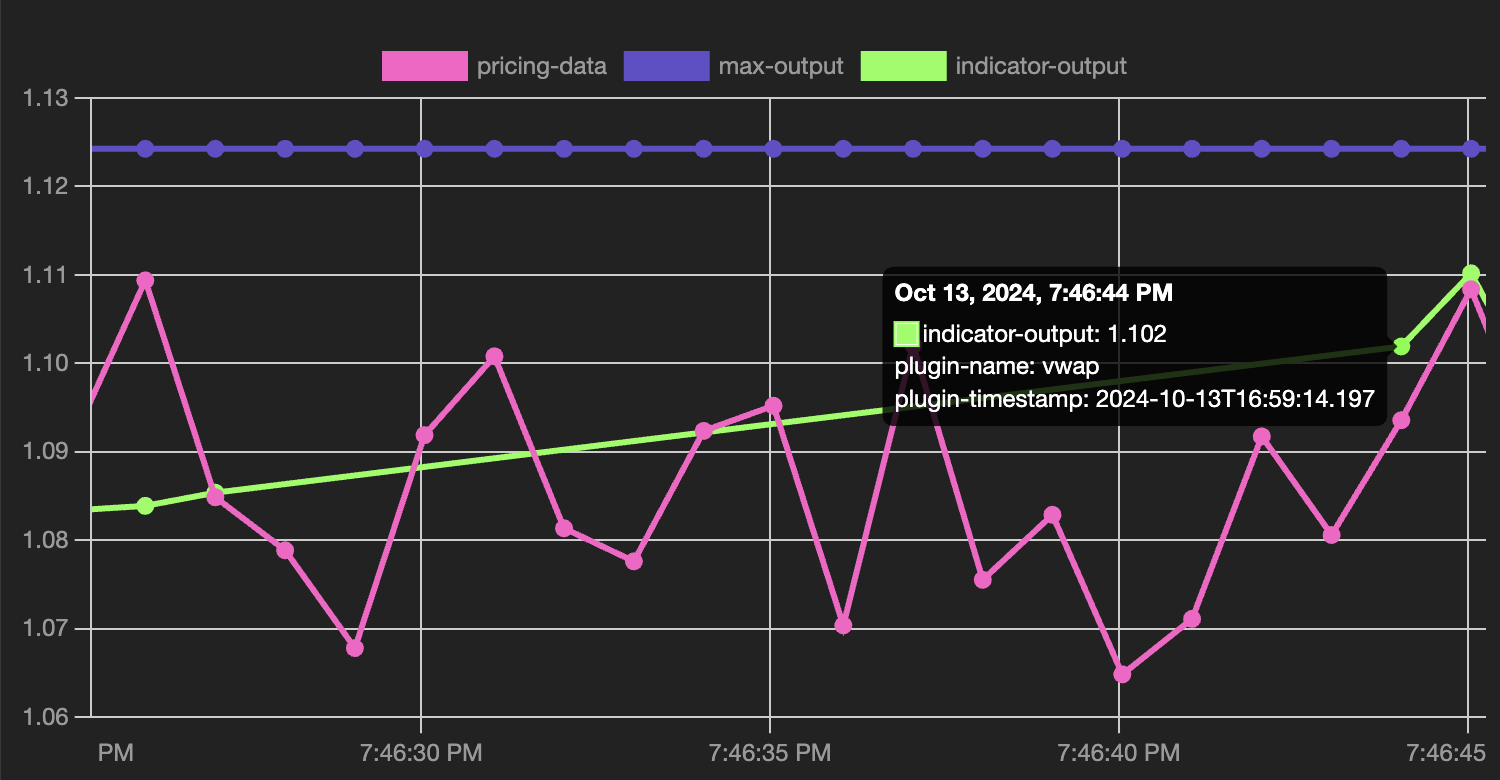
That’s right, as expected vwap has been moved in place!
Isn’t it glorious?
The Cherry-on-Top: Native Image Support
You might be familiar with the limitations in GraalVM native-image, notably, by design, usually Java bytecode cannot be dynamically loaded. But our plug-ins are not Java bytecode. The pure-Java Chicory runtime, supports native image compilation. You can check it yourself, by building the app with mvn package -Dnative and running the resulting application.
You will still be able to live load, redeploy, rebind data transforms on the fly!
Conclusions
We have seen how to realize a simple data streaming platform with pluggable data transforms, using Kafka and XTP. We hope we have convinced you how cool and fun XTP and Extism together can be. We are looking forward to seeing what you will build with them!
Edoardo Vacchi
Staff Research Engineer, Dylibso


